Stuffing Pin Cushion: Simple Guide to Make the Perfect Sewing Essential
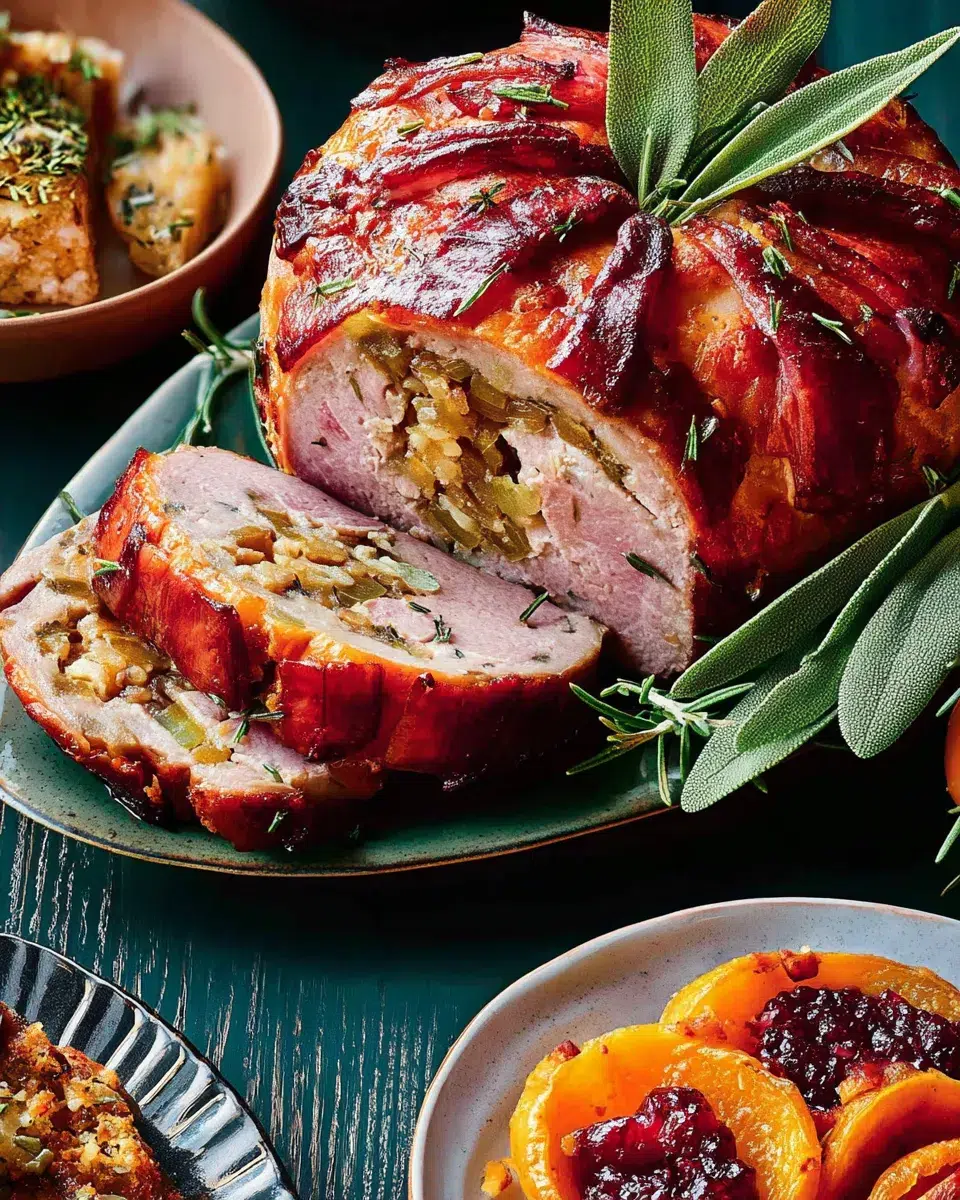
Stuffing pin cushion projects just got easier with this incredible festive recipe that transforms ordinary ingredients into a show-stopping centerpiece! Picture this: it’s Christmas morning, and your family gathers around the table as you unveil this golden, aromatic masterpiece that’s been filling your kitchen with the most heavenly scents. This isn’t just any ordinary dish – it’s a tradition-making, memory-creating pin cushion stuffing that will have everyone asking for your secret recipe year after year.
Why You’ll Love This Recipe
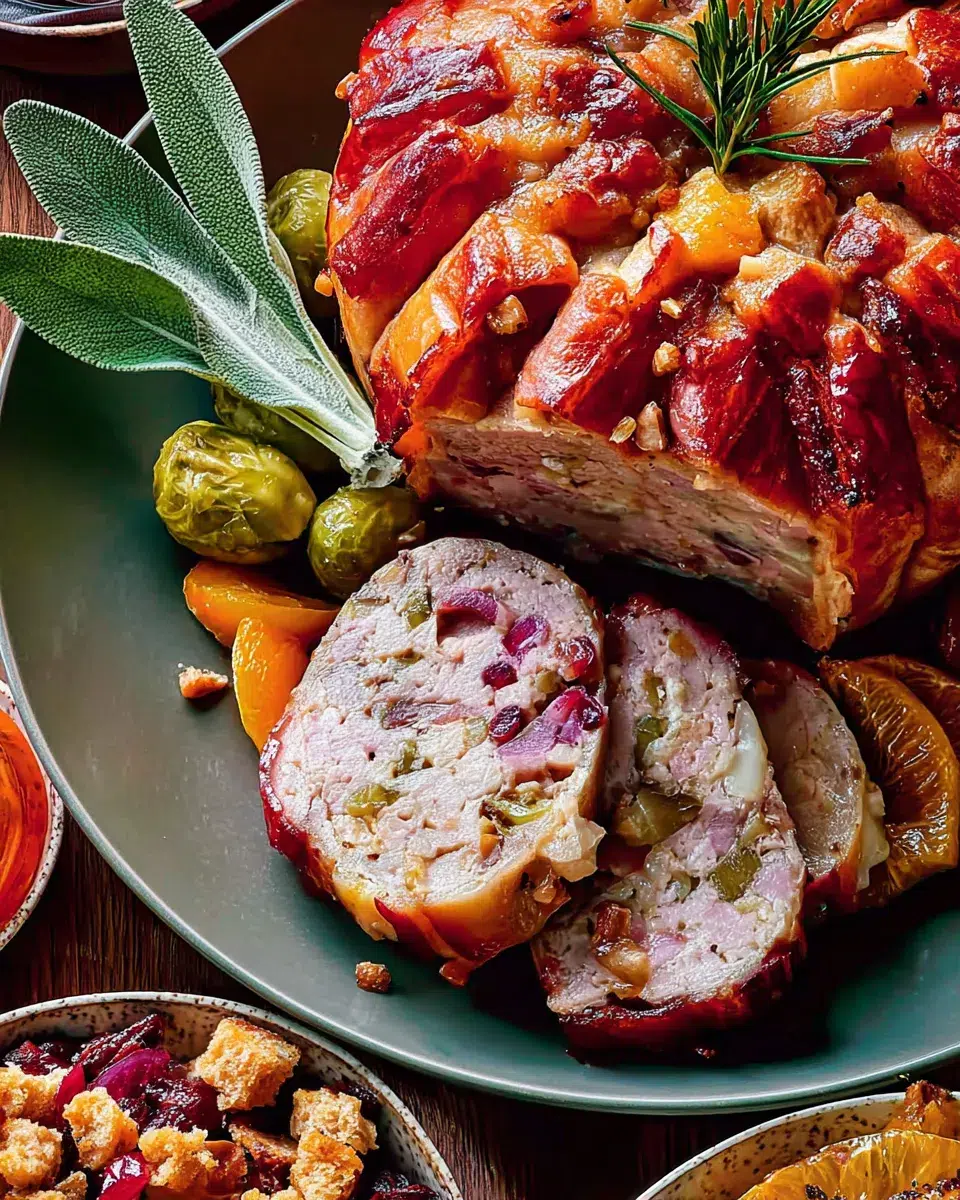
This DIY pin cushion fill recipe holds a special place in my heart because it reminds me of my grandmother’s kitchen during the holidays. She taught me that the best homemade pin cushion filling comes from combining unexpected flavors that somehow create perfect harmony. The sweet apricots dancing with savory sage, the crunch of pine nuts meeting tender chestnuts – it’s like a beautiful symphony of textures and tastes.
What makes this plush cushion stuffing truly exceptional is how it brings people together. I’ve watched families bond over preparing this dish, with kids helping chop ingredients while parents share stories. The pincushion fluff techniques in this recipe ensure every bite is perfectly seasoned and incredibly satisfying. Plus, it’s forgiving enough for beginners yet sophisticated enough to impress the most discerning palates.
Explore more festive dinner recipes here to complete your holiday menu with equally impressive dishes that complement this stunning centerpiece.
Ingredients List
This best fill for pin cushions recipe combines premium ingredients that create layers of flavor and texture. Here’s everything you’ll need, organized for easy preparation:
| Proteins & Base | Aromatics & Seasonings | Fruits & Nuts |
|---|---|---|
| 1.2 kg minced chicken or turkey | 1 tbsp rapeseed oil | 75 g dried apricots, chopped |
| 22–24 slices of beef or turkey strips | 2 red onions, sliced | 75 g prunes, chopped |
| 100 g fresh breadcrumbs | 2 garlic cloves, finely chopped | 180 g cooked peeled chestnuts, chopped |
| 10 g fresh sage, chopped | 50 g pine nuts | |
| 1/2 tsp ground nutmeg |
These easy pin cushion stuffing tips start with selecting the freshest ingredients possible – your sage should be vibrant green, your chestnuts should be firm, and your dried fruits should be plump and aromatic.
Find more creative lunch ideas here to discover how these same flavor combinations can transform your everyday meals into something extraordinary.
Step-by-Step Directions
Creating the perfect stuffing pin cushion requires careful attention to timing and technique. This detailed process ensures your homemade pin cushion filling achieves the ideal balance of flavors and textures that will make this dish unforgettable.
Start by preheating your oven to 190°C (375°F). Heat the rapeseed oil in a large skillet over medium heat, then add the sliced red onions. Cook for 8-10 minutes until they become golden and caramelized, stirring occasionally to prevent burning. Add the minced garlic and fresh sage, cooking for another 2 minutes until fragrant.

In a large mixing bowl, combine the minced chicken or turkey with the fresh breadcrumbs. Add the caramelized onion mixture, chopped apricots, prunes, chestnuts, and pine nuts. Season generously with ground nutmeg, salt, and freshly ground black pepper. Mix everything thoroughly with your hands to ensure even distribution of ingredients.
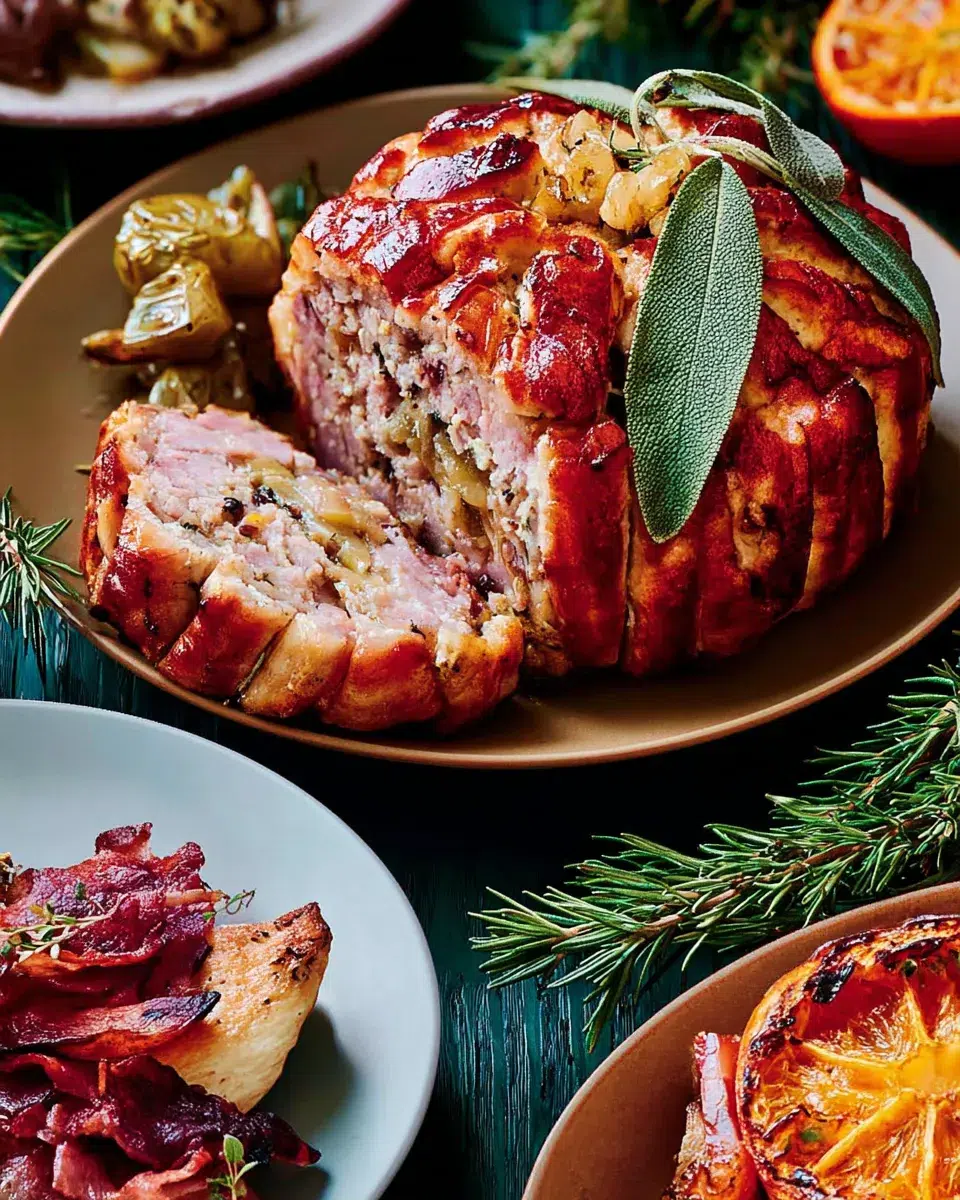
This DIY pin cushion fill technique creates layers of flavor that develop beautifully during cooking. Shape the mixture into a compact loaf and wrap it carefully with the beef or turkey strips, overlapping slightly to create a beautiful pattern. Secure with kitchen twine if needed.
Exact Timing to make Stuffing pin cushion
The preparation phase takes approximately 25-30 minutes, including the time needed for properly caramelizing onions and mixing ingredients. Cooking time requires 45-50 minutes in the preheated oven, with an internal temperature reaching 75°C (167°F) for food safety.
Allow the pin cushion stuffing to rest for 10-15 minutes after cooking before slicing. This resting period is crucial as it allows the juices to redistribute, ensuring each slice maintains its shape and delivers maximum flavor impact.
Nutritional Information
This plush cushion stuffing recipe provides excellent nutritional value while delivering exceptional taste. The combination of lean proteins, healthy fats, and complex carbohydrates creates a well-balanced dish perfect for special occasions.
| Nutrient | Per Serving (150g) | % Daily Value |
|---|---|---|
| Calories | 285 | 14% |
| Protein | 28g | 56% |
| Total Fat | 12g | 18% |
| Saturated Fat | 3.2g | 16% |
| Carbohydrates | 18g | 6% |
| Dietary Fiber | 3.5g | 14% |
| Sugar | 8g | – |
| Sodium | 420mg | 18% |
| Iron | 2.8mg | 16% |
| Vitamin C | 6mg | 7% |
The high protein content supports muscle maintenance, while the dried fruits provide natural antioxidants and essential minerals. Pine nuts contribute healthy monounsaturated fats and vitamin E, making this best fill for pin cushions recipe both nutritious and satisfying.
Healthier Alternatives
Transform this Stuffing pin cushion recipe to meet various dietary needs without compromising the incredible flavors that make it special. These modifications maintain the essential character while enhancing nutritional benefits.
| Dietary Need | Original Ingredient | Healthier Alternative | Benefits |
|---|---|---|---|
| Lower Carb | Fresh breadcrumbs | Cauliflower rice or almond flour | Reduces carbs by 60%, adds fiber |
| Heart-Healthy | Pine nuts | Chopped walnuts | Higher omega-3 fatty acids |
| Lower Sodium | Regular seasoning | Fresh herbs and lemon zest | Reduces sodium by 40% |
| Gluten-Free | Regular breadcrumbs | Gluten-free oats, ground | Safe for celiac diets |
| Leaner Protein | Regular ground meat | Ground turkey breast (99% lean) | Reduces saturated fat by 50% |
| Vegan Option | All meat components | Lentils and mushroom mixture | Plant-based protein, fiber-rich |
For those seeking lighter pincushion fluff techniques, substitute half the meat with finely chopped mushrooms to reduce calories while maintaining the satisfying texture. This modification creates an equally delicious result with enhanced umami flavors.
Explore more delicious desserts here to discover sweet treats that perfectly complement this savory masterpiece for your complete holiday menu.
Serving Suggestions
This elegant stuffing pin cushion serves beautifully as a centerpiece dish that commands attention on any holiday table. Slice it into thick portions and arrange on a warmed platter, garnished with fresh sage leaves and a drizzle of the pan juices for an impressive presentation.
Pair this homemade pin cushion filling with roasted root vegetables like honey-glazed carrots, buttery parsnips, and crispy Brussels sprouts. The earthy sweetness of these sides complements the rich, complex flavors of the stuffing perfectly. A light cranberry sauce or red wine jus adds the perfect acidic balance to cut through the richness.
For wine pairings, choose a medium-bodied red wine like Pinot Noir or a rich Chardonnay that won’t overpower the delicate balance of fruits and herbs. The easy pin cushion stuffing tips include warming your serving plates to maintain the optimal temperature throughout the meal.
Common Mistakes to Avoid
Overmixing the DIY pin cushion fill mixture can result in a dense, tough texture that lacks the light, fluffy quality you’re aiming for. Mix just until ingredients are evenly distributed, then stop immediately to preserve the tender consistency that makes this dish exceptional.
Temperature control is crucial for success with pin cushion stuffing recipes. Using too high heat will cause the outside to brown too quickly while leaving the center undercooked. Maintain the recommended 190°C (375°F) and use a meat thermometer to ensure the internal temperature reaches exactly 75°C (167°F).
Skipping the resting period after cooking is another common error that affects both presentation and flavor. Allow the plush cushion stuffing to rest for the full 10-15 minutes before slicing to prevent it from falling apart and to ensure the juices redistribute properly throughout the dish.
Storing Tips
Proper storage of your best fill for pin cushions creation ensures you can enjoy leftovers safely for several days. Cool the stuffing completely to room temperature before refrigerating, then store in airtight containers for up to 4 days in the refrigerator. The flavors actually improve overnight as they meld together.
For longer storage, this stuffing pin cushion freezes exceptionally well for up to 3 months when wrapped tightly in plastic wrap and aluminum foil. Slice the cooled stuffing before freezing for convenient individual portions that thaw and reheat more evenly.
When reheating, use gentle heat in a 160°C (325°F) oven covered with foil to prevent drying out. Add a splash of chicken broth if needed to restore moisture. Avoid microwaving as it can create uneven heating and compromise the carefully crafted texture of your pincushion fluff techniques.
FAQs
Q: How far in advance can I prepare my stuffing pin cushion recipe?
A: You can prepare the stuffing pin cushion mixture up to 24 hours ahead and refrigerate it unbaked. This actually improves the flavors as they have time to meld. Simply remove from refrigeration 30 minutes before baking to bring closer to room temperature, then proceed with the cooking instructions as written.
Q: What’s the best way to ensure my stuffing pin cushion doesn’t fall apart when slicing?
A: The key to slicing stuffing pin cushion successfully is using a very sharp knife and allowing proper resting time. Let it rest for 15 minutes after cooking, then use a sawing motion with a serrated knife rather than pressing down. Wipe the blade clean between cuts for the neatest presentation.
Q: Can I make stuffing pin cushion without nuts for allergy concerns?
A: Absolutely! Replace the pine nuts in your stuffing pin cushion with toasted pumpkin seeds or sunflower seeds for similar crunch and nutrition. You could also add extra chopped chestnuts or completely omit nuts while increasing the dried fruit quantities to maintain the recipe’s balance and texture.
Q: How do I know when my stuffing pin cushion is perfectly cooked?
A: Your stuffing pin cushion is perfectly done when it reaches an internal temperature of 75°C (167°F) measured with a meat thermometer in the thickest part. The exterior should be golden brown, and the juices should run clear when pierced. If it’s browning too quickly, tent with foil and continue cooking until the proper internal temperature is reached.

Stuffing Pin Cushion
- Total Time: 1 hour 20 minutes
- Yield: 6 servings 1x
Description
This Stuffing Pin Cushion recipe is a festive masterpiece combining savory herbs, juicy fruits, and tender meat for a show-stopping holiday centerpiece. The sweet apricots and prunes mingle beautifully with sage and chestnuts, creating a comforting, flavorful dish perfect for festive dinners or easy recipes for dinner during the holidays.
Ingredients
- 1.2 kg minced chicken or turkey
- 22–24 slices beef or turkey strips
- 100 g fresh breadcrumbs
- 1 tbsp rapeseed oil
- 2 red onions, sliced
- 2 garlic cloves, finely chopped
- 10 g fresh sage, chopped
- 75 g dried apricots, chopped
- 75 g prunes, chopped
- 180 g cooked peeled chestnuts, chopped
- 50 g pine nuts
- 1/2 tsp ground nutmeg
- Salt and freshly ground black pepper to taste
Instructions
- Preheat oven to 190°C (375°F).
- Heat rapeseed oil in a large skillet over medium heat. Add sliced red onions and cook 8-10 minutes until golden and caramelized.
- Stir in garlic and fresh sage; cook 2 minutes until fragrant.
- In a large bowl, combine minced chicken or turkey with breadcrumbs.
- Add the caramelized onion mixture, chopped apricots, prunes, chestnuts, pine nuts, nutmeg, salt, and pepper. Mix well with hands until evenly blended.
- Shape mixture into a compact loaf and wrap with overlapping slices of beef or turkey strips. Secure with kitchen twine if needed.
- Place on a baking tray and cook for 45-50 minutes or until the internal temperature reaches 75°C (167°F). Let rest 10-15 minutes before slicing.
Notes
Use high-quality dried fruits and fresh herbs for the best flavor. Allowing the loaf to rest after baking helps the juices redistribute, keeping every slice tender and flavorful.
- Prep Time: 30 minutes
- Cook Time: 50 minutes
- Category: Dinner
- Method: Baked
- Cuisine: British
Nutrition
- Serving Size: 1 slice
- Calories: 410
- Sugar: 9g
- Sodium: 540mg
- Fat: 22g
- Saturated Fat: 6g
- Unsaturated Fat: 14g
- Trans Fat: 0g
- Carbohydrates: 24g
- Fiber: 3g
- Protein: 32g
- Cholesterol: 105mg
Keywords: stuffing recipe, holiday recipes, recipes for dinner, festive food, chicken stuffing