Snowman Cake Pops – Cute & Easy Holiday Dessert
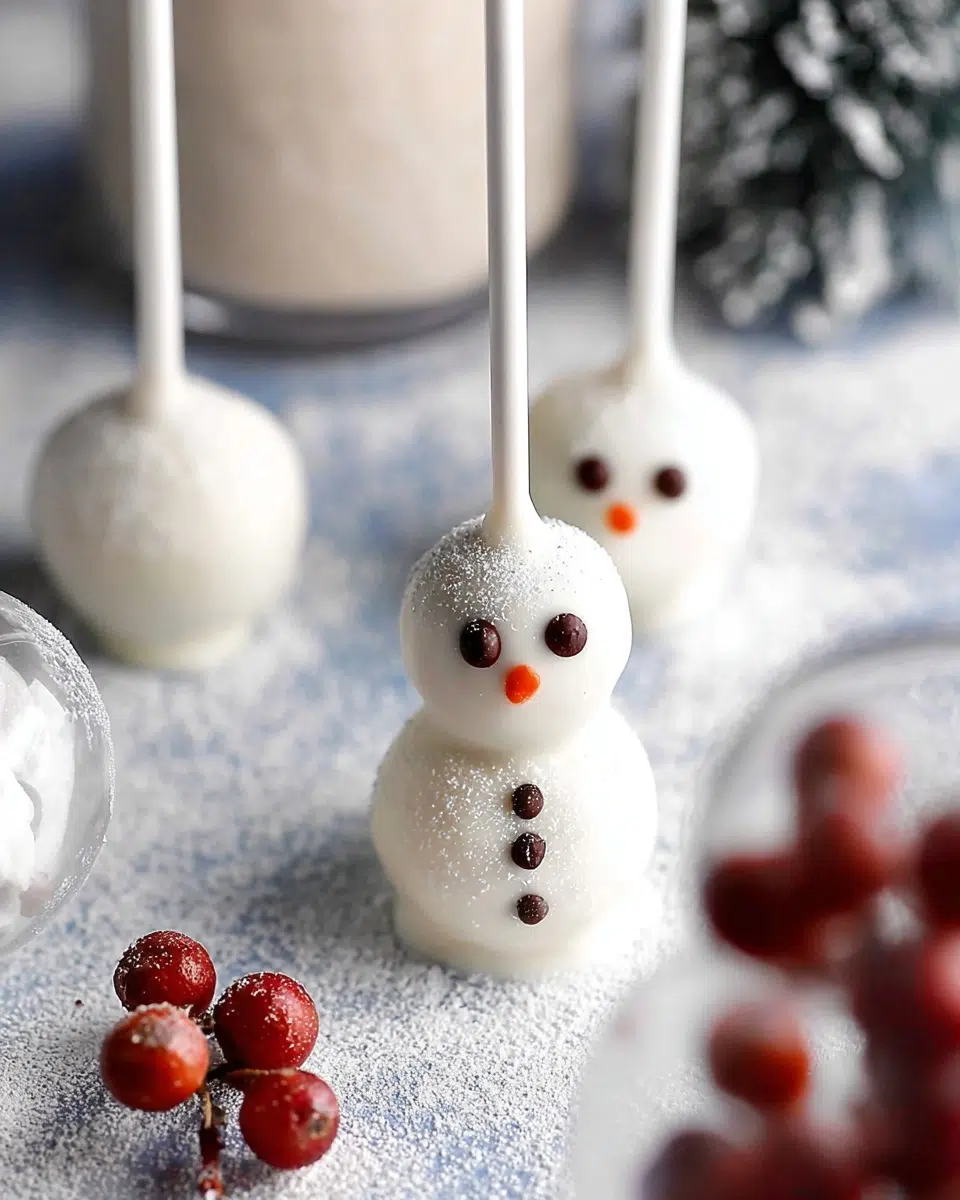
Snowman cake pops are the perfect way to bring winter magic to your dessert table this holiday season. Picture this: it’s a snowy December evening, and you’re in the kitchen with your little ones, their eyes sparkling with excitement as they help you roll cake mixture into perfect spheres.
The sweet aroma of vanilla fills the air while you transform simple cake crumbs into adorable snowman treats that would make Frosty himself jealous. These delightful winter dessert recipes combine the nostalgic joy of building snowmen with the irresistible taste of cake pops, creating memories that will last long after the last crumb is enjoyed.
There’s something truly special about creating festive cake pop tutorials that bring families together during the most wonderful time of year. Whether you’re planning a holiday party, looking for easy snowman treats to share with neighbors, or simply want to add some whimsy to your Christmas dessert spread, this snowman cake pops recipe delivers both visual appeal and incredible flavor.
Why You’ll Love This Recipe
Last Christmas, my neighbor Sarah knocked on my door with tears of frustration in her eyes. She’d been struggling for hours to make elaborate holiday cookies for her daughter’s school party, and everything kept going wrong. I invited her in, put on some hot cocoa, and we whipped up a batch of these magical snowman cake pops together. Within two hours, we had created two dozen perfectly adorable treats that had the kids at school absolutely mesmerized. The best part? Sarah felt like a holiday baking superstar without the stress.
This Christmas cake pops guide is designed for real life – those moments when you want to create something special but don’t have hours to spend on complicated techniques. The DIY cake pop decorations are forgiving, fun, and absolutely foolproof, making them perfect for both seasoned bakers and complete beginners.
Looking for the perfect meal to serve before these sweet treats? Explore more quick & easy dinner recipes here to complete your festive menu planning.
Ingredients List
| Ingredient | Quantity | Purpose |
|---|---|---|
| Vanilla cake mix | 1 box | Base for cake pop mixture |
| Vanilla icing | ⅓ cup | Binding agent for cake crumbs |
| White candy melts | 1 bag (12 oz) | Coating and snowman body |
| Mini chocolate chips | As needed | Eyes and buttons |
| Orange sprinkles or orange candy melts | As needed | Carrot nose |
These simple ingredients come together to create holiday cake pop ideas that look professionally made but require no special skills or equipment. The beauty of this recipe lies in its simplicity – you probably have most of these items in your pantry already!
Need something savory to balance out all these sweet treats? Find more delicious lunch ideas here for a well-rounded holiday meal plan.
Step-by-Step Directions
Prepare the Cake Base: Bake the vanilla cake according to package directions and let it cool completely. Once cooled, crumble the entire cake into fine crumbs using your hands or a food processor.
Create the Cake Pop Mixture: In a large bowl, combine the cake crumbs with vanilla icing. Mix thoroughly until the mixture holds together when pressed. The consistency should be moist but not soggy.
Shape the Snowman Bodies: Roll the mixture into 24 small balls for snowman heads and 24 slightly larger balls for bodies. Place them on a parchment-lined baking sheet and refrigerate for 2 hours.
Prepare the Coating Station: Melt the white candy melts in a microwave-safe bowl in 30-second intervals, stirring between each interval until smooth and creamy.
Assemble the Snowmen: Dip one end of a cake pop stick into the melted candy and insert it through the larger ball and into the smaller ball, creating the snowman shape. Repeat for all cake pops.
Apply the Coating: Dip each assembled snowman into the white candy melts, allowing excess to drip off. Tap gently to remove air bubbles and ensure even coverage.
Add Finishing Touches: While the coating is still wet, press mini chocolate chips for eyes and buttons, and add orange sprinkles or melted orange candy for the carrot nose. Place in a cake pop stand or styrofoam block to set completely.

Exact Timing to Make Snowman Cake Pops
- Cake Baking and Cooling: 45-60 minutes
- Mixing and Shaping: 30 minutes
- Chilling Time: 2 hours
- Melting and Decorating: 45 minutes
- Final Setting: 30 minutes
- Total Time: Approximately 4.5 hours (including chilling time)
The key to perfect Snowman Cake Pops is patience during the chilling stages, which ensures your treats hold their shape beautifully during the dipping process.
Nutritional Information
| Nutrient | Per Serving (1 cake pop) | Daily Value % |
|---|---|---|
| Calories | 145 | 7% |
| Total Fat | 6g | 9% |
| Saturated Fat | 4g | 20% |
| Trans Fat | 0g | – |
| Cholesterol | 15mg | 5% |
| Sodium | 135mg | 6% |
| Total Carbohydrates | 23g | 8% |
| Dietary Fiber | 0g | 0% |
| Total Sugars | 20g | – |
| Added Sugars | 18g | 36% |
| Protein | 2g | 4% |
| Vitamin A | 2% DV | 2% |
| Vitamin C | 0% DV | 0% |
| Calcium | 45mg | 3% |
| Iron | 0.6mg | 3% |
Nutritional data based on USDA guidelines and manufacturer specifications. Values may vary depending on specific brands used and portion sizes.
Healthier Alternatives
| Original Ingredient | Healthier Substitute | Benefit | Taste Impact |
|---|---|---|---|
| Vanilla cake mix | Whole wheat cake mix or almond flour cake | Increased fiber and protein | Slightly nuttier flavor |
| Vanilla icing | Greek yogurt cream cheese frosting | Reduced sugar, added protein | Tangier, less sweet |
| White candy melts | Sugar-free white chocolate or coconut butter coating | Lower calories, no artificial sweeteners | Slightly less sweet |
| Mini chocolate chips | Dark chocolate mini chips (70% cacao) | Antioxidants, less sugar | Richer chocolate flavor |
| Orange sprinkles | Dried carrot pieces or orange zest | Natural coloring, vitamins | More authentic carrot taste |
These modifications help create Snowman Cake Pops that accommodate various dietary preferences while maintaining the festive appeal. For diabetic-friendly versions, consider using stevia-sweetened cake mix and sugar-free chocolate coatings. Gluten-free alternatives work beautifully with almond flour or gluten-free cake mixes, making these treats accessible to everyone at your holiday gathering.
Looking for more sweet inspiration beyond these adorable winter treats? Explore more delicious Desserts here to discover additional festive recipes that will make your holiday celebrations unforgettable.

Serving Suggestions
Holiday Party Presentation: Arrange your Snowman Cake Pops in a winter wonderland display by sticking them into a styrofoam base covered with white felt or artificial snow. Add battery-operated fairy lights around the base and sprinkle edible glitter for a magical effect that will have guests reaching for their cameras before they reach for the treats.
Gift-Giving Ideas: Package individual Snowman Cake Pops in clear cellophane bags tied with festive ribbon for perfect holiday gifts. Include a small card with the recipe so recipients can recreate the magic at home. These make exceptional teacher gifts, neighbor treats, or party favors that show thoughtfulness without breaking the budget.
Themed Dessert Tables: Create a cohesive winter dessert spread by pairing your Snowman Cake Pops with complementary treats like hot chocolate bombs, sugar cookies shaped like mittens, and peppermint bark. The varying heights and textures create visual interest while maintaining the winter theme throughout your celebration.
Common Mistakes to Avoid
Rushing the Chilling Process: The biggest mistake when making Snowman Cake Pops is skipping or shortening the refrigeration time. Without proper chilling, your cake balls will fall apart during the dipping process, creating frustration and wasted ingredients. Always allow the full 2-hour chilling time, and if your kitchen is particularly warm, consider chilling for an additional 30 minutes to ensure stability.
Overheating the Candy Melts: Many beginners make the error of melting candy coating too quickly or at too high a temperature, resulting in thick, clumpy coating that won’t adhere properly. Always use 30-second intervals in the microwave, stirring between each heating session. If the coating becomes too thick, add a small amount of coconut oil or shortening to restore the proper consistency.
Adding Decorations Too Late: Waiting until the white coating has completely set before adding eyes, buttons, and noses is a common timing mistake. The decorative elements need to be pressed into the coating while it’s still slightly wet to ensure they stay secure. Have all your decorating supplies ready before you begin the dipping process to avoid this timing issue.
Storing Tips
Short-Term Storage: Store completed Snowman Cake Pops in an airtight container at room temperature for up to one week. Layer them between sheets of wax paper to prevent the decorations from shifting or the coating from scratching. Keep the container in a cool, dry place away from direct sunlight to maintain the best appearance and texture.
Refrigeration Guidelines: For longer storage or during warm weather, refrigerate your Snowman Cake Pops for up to two weeks. Allow them to come to room temperature for 15-20 minutes before serving to restore the optimal texture and prevent condensation from forming on the coating. This method works particularly well if you’re making them ahead for holiday parties.
Freezing for Extended Storage: Snowman Cake Pops freeze beautifully for up to three months when properly wrapped. Place them in a single layer in an airtight container with parchment paper between layers, then wrap the entire container in plastic wrap before freezing. Thaw overnight in the refrigerator, then bring to room temperature before serving to maintain the perfect texture and appearance.
FAQs
Q: How far in advance can I make Snowman Cake Pops for my holiday party?
A: You can make Snowman Cake Pops up to one week ahead when stored properly at room temperature, or up to two weeks if refrigerated. For best results, add the final decorative touches the day before serving to ensure the mini chocolate chips and orange accents look fresh and vibrant. This timing allows you to manage party preparation stress while ensuring optimal taste and appearance.
Q: What’s the best way to fix Snowman Cake Pops if the coating cracks or chips?
A: If your Snowman Cake Pops develop cracks or chips in the coating, gently warm a small amount of white candy melts and use a clean paintbrush or toothpick to smooth the melted coating over the damaged area. Allow it to set completely before adding any additional decorations. This repair method works best when done within 24 hours of the initial coating.
Q: Can I make Snowman Cake Pops without special cake pop sticks?
A: Absolutely! While traditional cake pop sticks create the classic presentation, you can make Snowman Cake Pops as standalone treats without sticks. Simply shape and decorate them as you normally would, then place them in mini cupcake liners for serving. This method actually makes them easier for small children to eat and eliminates any choking hazard concerns.
Q: Why do my Snowman Cake Pops fall off the sticks during the dipping process?
A: Snowman Cake Pops typically fall off sticks due to insufficient chilling time or inserting the stick too shallowly. Ensure your cake balls are chilled for at least 2 hours and that you dip the stick end in melted candy before inserting it at least halfway through both the body and head portions. The melted candy acts as “glue” to secure the connection, preventing separation during the coating process.
Snowman Cake Pops
- Total Time: 4.5 hours
- Yield: 24 cake pops 1x
Description
These Snowman Cake Pops bring winter charm to your holiday dessert table with their adorable design and sweet vanilla flavor. Easy to make and fun to decorate, they are perfect for family baking, holiday parties, and anyone looking for recipes easy, recipes baking, or food recipes dessert during the festive season.
Ingredients
- 1 box vanilla cake mix
- 1/3 cup vanilla icing
- 1 bag white candy melts
- Mini chocolate chips
- Orange sprinkles or orange candy melts
Instructions
- Bake the vanilla cake according to package directions and let it cool completely.
- Crumble the cooled cake into fine crumbs using your hands or a food processor.
- Mix cake crumbs with vanilla icing until the mixture holds together when pressed.
- Roll 24 small balls for heads and 24 larger balls for bodies, then chill for 2 hours.
- Melt white candy melts in 30 second intervals until smooth.
- Dip the end of a cake pop stick into melted candy and insert through a larger ball and into a smaller ball to form each snowman.
- Dip each assembled cake pop into melted white candy, letting excess drip off.
- Press mini chocolate chips onto the wet coating for eyes and buttons, then add an orange sprinkle or melted orange candy for the nose.
- Place cake pops upright in a stand or styrofoam block until fully set.
Notes
Chilling the shaped cake balls thoroughly helps them stay firm during dipping and ensures smooth coating.
- Prep Time: 30 minutes
- Cook Time: 45 to 60 minutes
- Category: Dessert
- Method: No Bake and Dipped
- Cuisine: American
Nutrition
- Serving Size: 1 cake pop
- Calories: 160
- Sugar: 14g
- Sodium: 95mg
- Fat: 7g
- Saturated Fat: 4g
- Unsaturated Fat: 3g
- Trans Fat: 0g
- Carbohydrates: 23g
- Fiber: 0g
- Protein: 1g
- Cholesterol: 10mg
Keywords: snowman cake pops, holiday cake pops, recipes baking, recipes easy, food recipes dessert