Christmas Reindeer Chocolate Cone Bags – Cute & Delicious Snacks
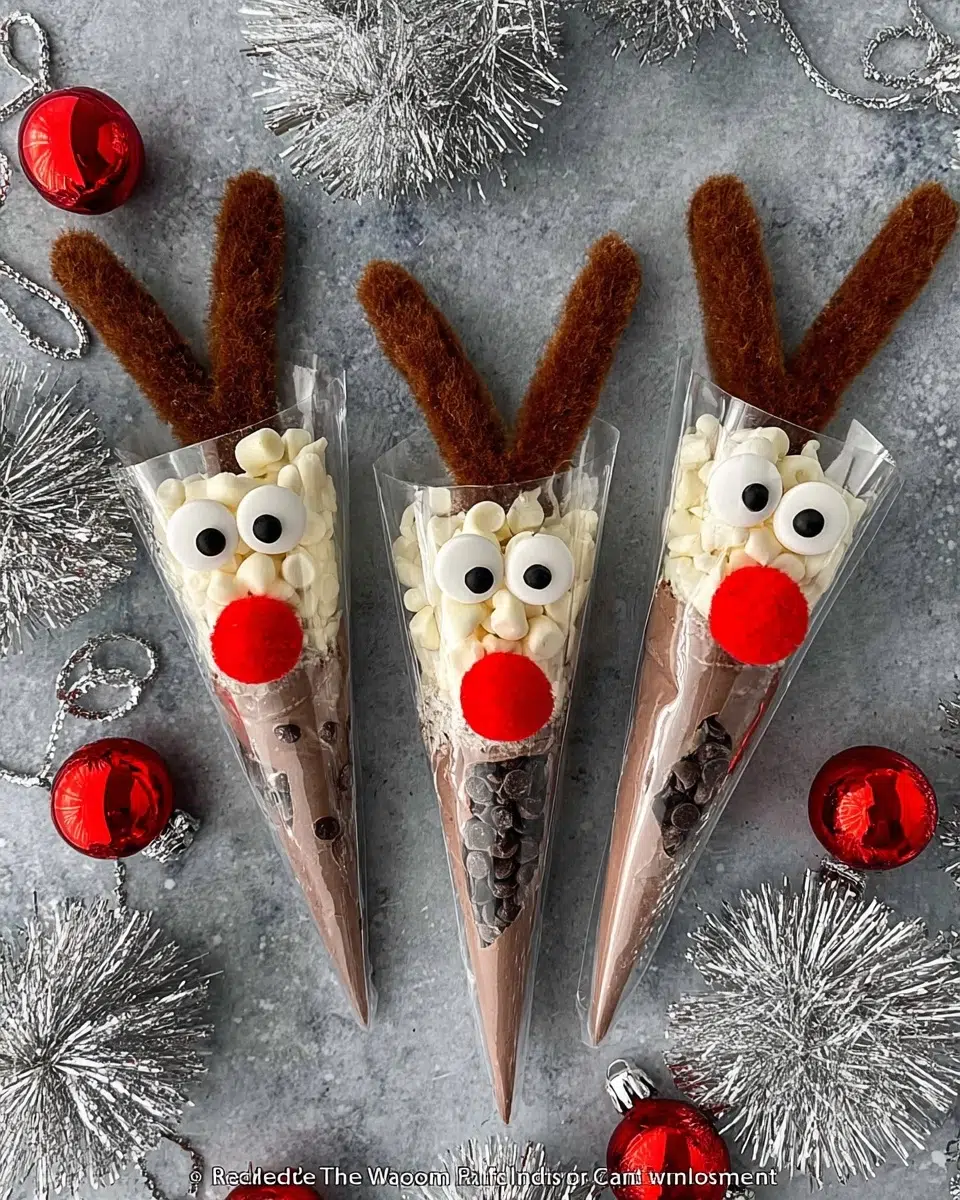
Reindeer Chocolate Cone Bags are about to become your new holiday obsession! Picture this: last December, I was frantically searching for the perfect party favors for my daughter’s classroom Christmas celebration. Store-bought treats felt impersonal, and elaborate baking projects seemed impossible with my packed schedule.
That’s when inspiration struck during our evening hot chocolate ritual – what if I could transform simple triangle piping bags into adorable reindeer faces filled with cozy cocoa goodness?
These delightful holiday chocolate treats became an instant hit, with kids squealing in delight over their cute reindeer friends and parents asking for the “recipe.” The best part? They took less than 30 minutes to assemble, cost under $15 for the entire class, and created memories that lasted long after the marshmallows were gone.
Why You’ll Love This Recipe
These DIY Christmas party favors solve every holiday hosting dilemma I’ve ever faced. Whether you’re planning a classroom party, neighborhood gathering, or family celebration, these festive chocolate cone recipes deliver maximum impact with minimal effort. I love how each child gets excited about “feeding” their reindeer by drinking the hot cocoa – it’s interactive entertainment and treat rolled into one!
The magic happens when you watch little faces light up as they discover the surprise inside their reindeer friend. These easy holiday dessert ideas work perfectly for any skill level, and I’ve successfully made them with my 6-year-old nephew as my enthusiastic assistant. Plus, they’re completely customizable – swap the cocoa for different drink mixes or adjust the decorations based on what you have at home.
Explore more quick & easy dinner recipes here to complete your holiday meal planning!
Ingredients List
| Ingredient | Quantity |
|---|---|
| Triangle Piping Bags | 1 |
| Hot cocoa mix | ⅓ cup |
| Mini marshmallows | ⅓ cup |
| Chocolate chips | 2 tablespoons |
| Red pom pom balls | 1 |
| Wiggly eyes | 2 |
| Brown pipe cleaners | 1 |
| Glue | As needed |
These reindeer themed holiday snacks require just a few simple craft supplies combined with pantry staples you likely already have on hand. The beauty of these Christmas chocolate bag crafts lies in their simplicity – no special equipment or advanced crafting skills required!
Find more delicious lunch ideas here to keep your holiday menu planning stress-free.
Step-by-Step Directions
Prepare your workspace by laying out all craft supplies and ingredients. This makes assembly much faster when you’re creating multiple Reindeer Chocolate Cone Bags.
Fill the piping bag with hot cocoa mix first, then add mini marshmallows and chocolate chips. Leave about 2 inches of space at the top for sealing and decorating.
Twist and secure the top of the bag tightly to prevent spilling. You can use a small rubber band or twist tie for extra security.
Create the reindeer face by gluing two wiggly eyes near the top of the sealed bag. Position them about an inch from the twist closure.
Add the red nose by attaching the pom pom ball below and between the eyes. This creates the classic Rudolph look that kids absolutely love.
Shape the antlers by cutting the brown pipe cleaner in half, then bending each piece into a simple antler shape with 2-3 small branches.
Attach the antlers by carefully poking small holes in the bag behind the eyes and threading the pipe cleaners through. Secure with a small dab of glue on the inside.
Final touches include ensuring all decorations are firmly attached and the bag is properly sealed to prevent any cocoa mix from escaping during transport.
Exact Timing to make Reindeer Chocolate Cone Bags
- Prep Time: 5 minutes for gathering and organizing all materials
- Assembly Time: 20-25 minutes for creating the complete reindeer design
- Total Time: 25-30 minutes per batch of 6-8 treats
- Cooling/Setting Time: 10 minutes for glue to fully dry before handling
The entire process becomes even faster once you establish a rhythm. I recommend setting up an assembly line if you’re making multiple bags for a larger group.
Nutritional Information
| Nutrient | Per Serving | % Daily Value |
|---|---|---|
| Calories | 180 | 9% |
| Total Fat | 4g | 6% |
| Saturated Fat | 2.5g | 13% |
| Cholesterol | 5mg | 2% |
| Sodium | 190mg | 8% |
| Total Carbohydrates | 38g | 13% |
| Dietary Fiber | 1g | 4% |
| Total Sugars | 32g | – |
| Added Sugars | 28g | 56% |
| Protein | 4g | 8% |
| Calcium | 120mg | 12% |
| Iron | 0.8mg | 4% |
Nutritional values are based on standard hot cocoa mix preparation with 8oz whole milk. These festive treats provide a good source of calcium and protein while delivering the comforting warmth perfect for holiday celebrations.
Healthier Alternatives
| Original Ingredient | Healthier Swap | Benefit |
|---|---|---|
| Regular hot cocoa mix | Sugar-free or organic cocoa powder with stevia | Reduces sugar content by 60% while maintaining rich chocolate flavor |
| Mini marshmallows | Freeze-dried strawberries or banana chips | Adds natural fruit sweetness and vitamin C |
| Chocolate chips | Dark chocolate chips (70% cacao) or cacao nibs | Provides antioxidants and reduces processed sugar |
| Whole milk preparation | Unsweetened almond, oat, or coconut milk | Lower calories, dairy-free option for allergies |
| Standard portion size | Mini portions using smaller bags | Perfect portion control for younger children |
These modifications make Reindeer Chocolate Cone Bags suitable for various dietary needs without sacrificing the fun factor. You can easily customize based on specific allergies or preferences in your group.
Explore more delicious Desserts here for additional healthy holiday treat inspiration!

Serving Suggestions
Holiday Party Presentation: Display your Reindeer Chocolate Cone Bags in a festive basket lined with holiday fabric or arrange them standing upright in tall glasses for an impressive centerpiece. Include small instruction cards showing kids how to empty the contents into hot milk for the full experience.
Interactive Hot Chocolate Bar: Set up a dedicated station with thermoses of hot milk, whipped cream, and additional toppings like cinnamon sticks or peppermint pieces. This creates an engaging activity where children can customize their reindeer cocoa while adults enjoy watching the excitement unfold.
Gift Giving Enhancement: Bundle 2-3 bags together with ribbon and attach to holiday cards or small gifts as an extra special touch. They work beautifully as teacher appreciation gifts, neighbor treats, or party favors that guests will actually remember and talk about long after your celebration ends.
Common Mistakes to Avoid
Overfilling the bags is the most frequent error I see when people first attempt this project. Leave adequate space at the top for proper sealing and decoration attachment. When bags are too full, the contents spill out and the reindeer features won’t stay securely attached.
Using wet glue or not allowing proper drying time leads to decorations sliding off during transport. Always use craft glue specifically designed for mixed materials, and let each element dry completely before adding the next decoration. Rushing this step ruins the entire aesthetic appeal.
Forgetting to test your piping bags before assembly can result in disappointing leaks. Check each bag for small holes or weak seams by gently squeezing before adding ingredients. It’s much easier to replace a defective bag early than to clean up cocoa powder later.
Storing Tips
Short-term storage works best in airtight containers or sealed plastic bags kept at room temperature for up to one week. Avoid storing in humid areas like near the stove or dishwasher, as moisture can make decorations fall off and cause cocoa powder to clump together.
Pre-made preparation allows you to assemble these treats up to two weeks ahead when stored properly in the refrigerator. Place completed Reindeer Chocolate Cone Bags in rigid containers to prevent crushing, and add desiccant packets if you live in a particularly humid climate.
Transportation considerations require careful packing in sturdy boxes with tissue paper or bubble wrap between layers. The decorations are more delicate than they appear, so treat them like you’re transporting cookies to maintain their adorable appearance until serving time.
FAQs
Can I make Reindeer Chocolate Cone Bags ahead of time for large parties?
Absolutely! Reindeer Chocolate Cone Bags store beautifully for up to two weeks when kept in airtight containers. I recommend making them in batches of 12-15 to streamline your holiday preparation without overwhelming your workspace.
What’s the best way to seal Reindeer Chocolate Cone Bags to prevent spilling?
Double-twist the top of each bag and secure with both a rubber band and small piece of tape for extra protection. This method keeps your Reindeer Chocolate Cone Bags intact during transport and prevents any disappointing messes during your party.
Can children help make Reindeer Chocolate Cone Bags safely?
Yes! Kids ages 5 and up can easily help with filling bags and placing decorations, making Reindeer Chocolate Cone Bags perfect for family crafting time. I supervise the gluing steps and let children handle ingredient measuring and eye placement for a fun collaborative experience.
Are Reindeer Chocolate Cone Bags suitable for children with food allergies?
Many ingredients in Reindeer Chocolate Cone Bags can be substituted for allergy-friendly alternatives. Use dairy-free cocoa mix, replace chocolate chips with safe alternatives like sunflower seeds, and always check all ingredient labels to ensure your Reindeer Chocolate Cone Bags meet specific dietary requirements.

Reindeer Chocolate Cone Bags
- Total Time: 25 to 30 minutes
- Yield: 1 cone bag 1x
Description
Reindeer Chocolate Cone Bags are charming DIY treats made with simple craft supplies and cozy cocoa ingredients. They are perfect for recipes for kids, recipes quick and easy, and food recipes that double as fun holiday gifts or party favors.
Ingredients
- 1 triangle piping bag
- 1/3 cup hot cocoa mix
- 1/3 cup mini marshmallows
- 2 tablespoons chocolate chips
- 1 red pom pom ball
- 2 wiggly eyes
- 1 brown pipe cleaner
- Glue as needed
Instructions
- Lay out all materials and ingredients to streamline assembly, especially when making multiple cone bags.
- Fill the piping bag with hot cocoa mix, then add mini marshmallows followed by chocolate chips, leaving about 2 inches at the top.
- Twist the opening securely and fasten with a twist tie or rubber band to keep the contents contained.
- Glue two wiggly eyes near the top of the bag about an inch below the twist.
- Attach the red pom pom below the eyes to create the reindeer nose.
- Cut the brown pipe cleaner in half and shape each piece into simple antlers with small branches.
- Poke tiny holes behind the eyes and thread the pipe cleaner antlers through, securing with a dab of glue if needed.
- Check that all decorations are firmly attached and the bag is properly sealed for easy gifting or transport.
Notes
When creating multiple bags, work in an assembly line to save time. Allow glue to dry fully before stacking or packaging the treats.
- Prep Time: 5 minutes
- Cook Time: 0 minutes
- Category: Dessert
- Method: No Cook
- Cuisine: American
Nutrition
- Serving Size: 1 bag
- Calories: 240
- Sugar: 27g
- Sodium: 90mg
- Fat: 8g
- Saturated Fat: 4g
- Unsaturated Fat: 3g
- Trans Fat: 0g
- Carbohydrates: 38g
- Fiber: 1g
- Protein: 3g
- Cholesterol: 5mg
Keywords: holiday treats, recipes quick and easy, recipes for kids, food recipes